FAQs – Oris Cell Migration Assay
Oris assays provide a more physiologically relevant environment than Boyden / transwell assays because there is no artificial membrane through which cells must pass. Moreover, cell movements can be monitored in real time in Oris assays, as there is no membrane to interfere with microscopic observation. This not only provides more information, but also accelerates methods development because your end point is evident from simply observing the assay.
The Oris 3D Embedded Invasion Assay is superior to Boyden / transwell assays for cell invasion because the cells are embedded in 3D throughout the assay, whereas cells are seeded on a 2D surface in Boyden / transwells assays, which changes cell physiology significantly (e.g. references 1,2,3,4,5,6,7,8).
Oris cell migration assays do not damage the cells, whereas scratch assays do. More important, the uniform cell-free detection zone provides for much more robust statistics than do scratch assays, as this publication and this application note illustrate.
No. We recommend the Oris Universal Cell Migration Assembly Kits if you want to coat plates yourself. These kits are provided with the plates and stoppers packaged separately. Coat the plates as you wish, then insert the stoppers just before you start your experiment.
Oris Migration, Oris Invasion, Oris Pro Migration and Oris 3D Embedded Invasion assays are designed to work with most adherent cell lines. Non-adherent cells can also be used in the Oris 3D Embedded Invasion Assay. Platypus has performed many successful tests of Oris products with HT-1080, MDA-MB-231, PC3 and HUVEC cells. Many other cell lines have been used by customers like you with Oris, as a Google Scholar search for (“Oris” AND “cell migration”) will reveal.
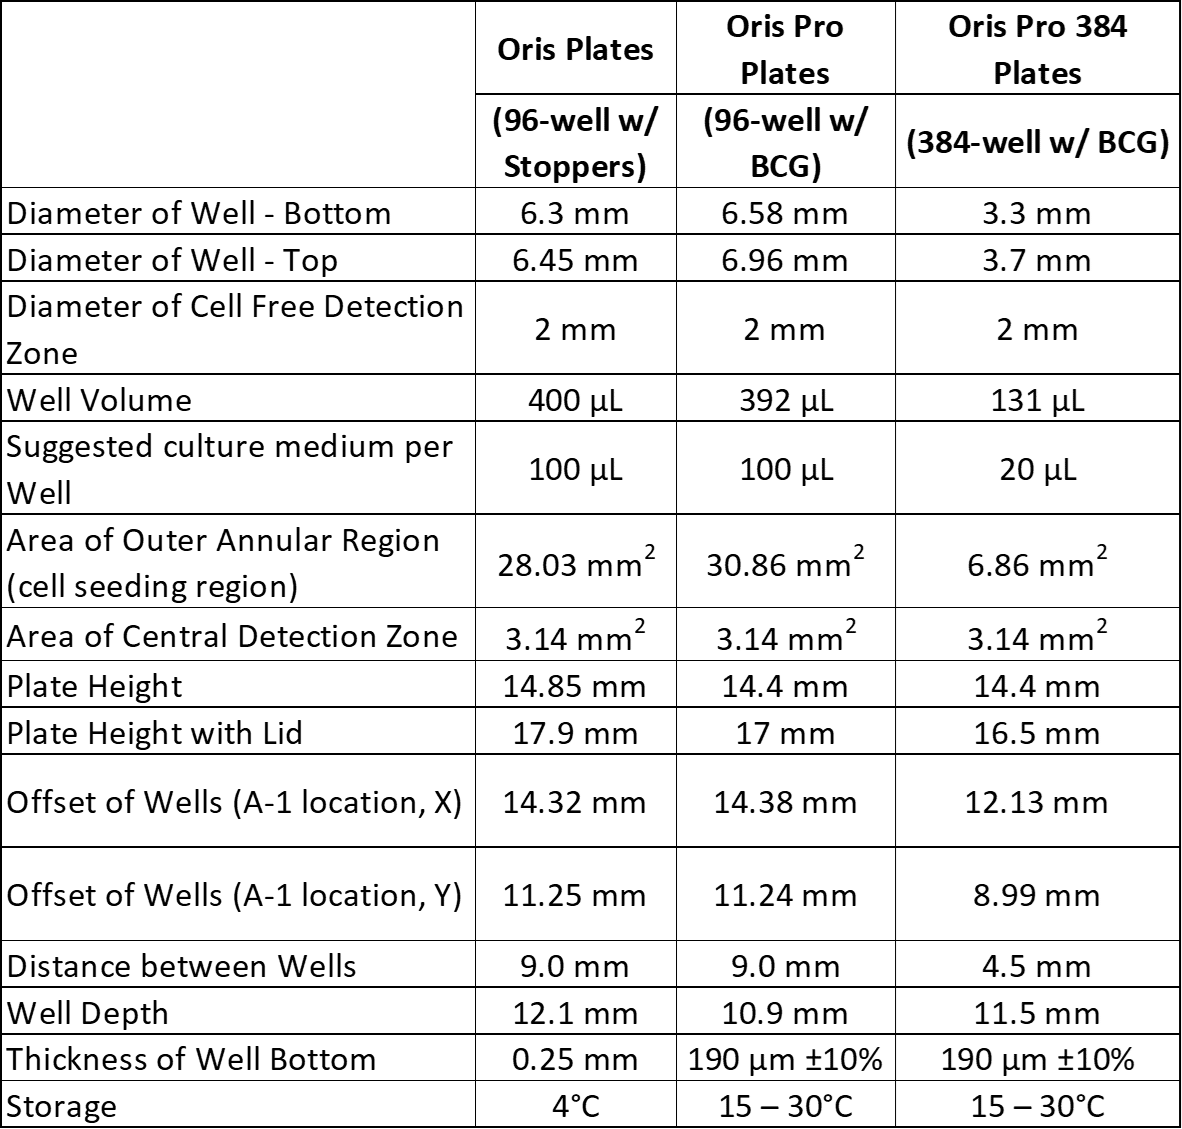
Aim for 95-100% confluent monolayers around the cell exclusion zone at the start of the experiment. Seeding at a higher density may result in cells in the Detection Zone at the beginning of the assay while seeding at a lower density will yield fewer migrating cells in the detection zone after migration. Typically, 20,000 – 75,000 cells are seeded per well in Oris and Oris Pro 96-well plates, and 2,500 – 10,000 per well in Oris Pro 384-well plates. For your first experiment, we recommend testing several different cell seeding densities as described in Appendix 1 in the assay protocol.
For Oris 3D Embedded Invasion assays, we recommend seeding at 30,000 – 50,000 cells per well. As many as 75,000 cells per well may be seeded for some cell lines, but many invasive cells lines express high levels of matrix metalloproteinases that can degrade the collagen to the point where it collapses or even liquefies at high cell densities. Adding fewer cells ameliorates this problem.
For the best statistics, choose an assay time that results in untreated cells closing at least 2/3 of the original open area of the detection zone, but less than 100% closure. An advantage of the Oris Cell Migration and Invasion Assays is that you can inspect the experiment at any time during the incubation period to ascertain how far the cells have moved. The first time you run an Oris assay, simply observe the cells periodically under a microscope to assess the extent of migration/invasion and stop the experiment when the appropriate degree of movement is observed.
Since rates of cell movement differ widely between different cell types, optimal incubation times will vary with varying cell types. Migration times can vary from 16 – 72 hours, while invasion times can vary from 1 – 6 days. For extended experiments, we recommend that you change culture medium above with fresh inhibitors every 48-72 hr.
The Oris kits are configured for use in a single experiment. For Oris, the stoppers must be stored refrigerated until use to preserve the perfect structural fit that generates the reproducible, tightly bounded exclusion zone. For OrisPro, the humidity in the incubator hydrates the gel in the unused wells, which will create variability in exclusion zone size and gel dissolution time in subsequent experiments.
If you need fewer than 96 wells per experiment, consider the Oris Cell Migration Assembly Kit – FLEX, which includes four 96-well plates and four packs of 24 stoppers. Use each plate only once, with any number of stoppers that is a multiple of four.
No. The stoppers must be stored refrigerated until use to preserve the perfect structural fit that generates the reproducible, tightly bounded exclusion zone. Stoppers that have been held at 37°C for any length of time will not fit properly, leading to irregular, variable exclusion zones.
The tip of a properly inserted stopper will create a bull’s-eye pattern at the bottom of the well. To view this bull’s-eye pattern, turn the plate over after inserting the stoppers and tilt the plate at an angle. You will be able to see this bull’s-eye pattern in the center of each well through the clear bottom surface. Stoppers that have not sealed well can be re-inserted until the tip is properly placed.
No. Although 96-well plates are “industry standard”, well dimensions vary between suppliers. Since the stopper must fit perfectly in order to generate the reproducible, tightly bounded exclusion zone, only Oris plates will work properly.
First secure the plate by holding it firmly against your work surface. Next, slide the tines of the stopper tool between the top of the stopper strip backbone, keeping the underside of the stopper tool parallel with the top surface of the plate. Finally, lift the stopper tool vertically to remove the stopper gently. Do not use the stopper tool as a lever to pry the stoppers from the well, as doing so may cause displacement of the cells.
Pre-migration/invasion reference wells are used to establish the size and position of the detection zone in order to quantify the extent of movement in experimental wells.
For Oris assays, you can leave some stoppers in place until you read the results. Since Oris Pro assays lack stoppers, this method is not applicable.
For Oris Pro and Oris assays, alternative methods to establish reference wells are:
Simply collect images at time zero as migration is about to begin.
Add fixative to replicate wells or a replicate plate at the beginning of the assay. However, when fixing cells in a subset of wells in the plate, this method risks impacting cells adjacent to fixed wells as they may be exposed to fixative vapors.
Add an inhibitor of migration or invasion, such as cytochalasin D, to reference wells at the beginning of the assay. Be sure to add sufficient inhibitor to block cell movement completely.
You may wish to read a related application note here.
The assay plate may have been jolted after removal of Oris Stoppers or dissolution of the Oris Pro gel. Be careful when transferring the plates from work surface to incubator.
The cell line may be poorly adhered to the plate surface. Possible solutions are:
If you used a TC-treated plate, try a collagen I- or fibronectin-coated plate for better adhesion.
If using Oris assays, allow a longer time for cells to adhere before adding culture medium.
If using Oris Pro assays, try reducing the volume in which cells are seeded so they reach the plate surface more quickly.
If cell density is high, try seeding fewer cells so that all cells have the opportunity to adhere.
For Oris Stopper-Based Assays, lightly tap the plate on your work surface to distribute cells evenly after seeding the cells but before removing the stoppers.
For Oris assays, add test compounds to the culture medium once the cells have attached and the stoppers have been removed, but before migration begins.
For Oris Pro Assays, add test compounds once the BCG has dissolved and the cells have attached, but before migration begins.
For both Oris and Oris Pro assays, adhesion time is dependent on cell line and plate coating, with attachment times. You may remove and replace the medium prior to adding test compounds in order to eliminate any non-adherent cells. In the invasion assays, compounds may be incorporated into the collagen I solutions and/or added to the culture medium above the collagen.
There are several options, simplest first:
1. Run the assay for less time than the cell doubling time to limit proliferation.
2. Add an inhibitor of proliferation such actinomycin D that does not inhibit migration or invasion.
3. Immunostain with an anti-Ki67 antibody, a marker found only on proliferating cells, and discount Ki67-positive cells from the results.
Monitor the assay by video microscopy so each cell’s history during the assay. This a time-consuming and data-heavy approach requiring expensive equipment.
Cells are typically visible under bright field optics without staining, especially if phase contrast optics are available. However, staining makes cells easier to see, and can reveal physiological states that bright field optics cannot. The Oris Assays impose no restrictions on choice of stain, and you can use multiple stains simultaneously if desired.
To quantify migration/invasion via area closure, we recommend a fluorescent cytoplasmic stain such as TRITC-phalloidin in order to maximize signals for your detector.
To quantify migration/invasion by counting cells, we recommend a nuclear stain such as DAPI. Restricting the stain to the nuclei creates smaller objects for imaging than do cytoplasmic stains, providing greater separation between individual cells and therefore more accurate counts.
You may also consider pre-labelling cells prior to seeding in the Oris assays. However, some stains may impact migration and/or invasion, potentially creating experimental artifacts.